Touch Boards (Rough and Smooth Boards)
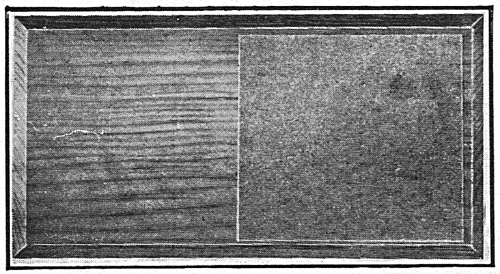
Touch boards are three small wooden boards: one half sandpaper and half smooth, one with alternating strips, one with strips graded from fine to coarse. A child of about 2.5 to 3 washes and dries their hands, then strokes each board as lightly as possible to feel rough from smooth. It's Montessori's first touch exercise.
Sourced from the texts, not yet presented at home
| Typical age | 2.5 to 4.5 years |
|---|---|
| Area | Sensorial |
| Before this | |
| Materials | |
| Direct aim | To feel the difference between rough and smooth with the fingertips, then to feel finer and finer differences. |
| Control of error | The child's own fingertips, with the eyes as a check. Board 1 has only two textures, so a child who names them wrong can open their eyes and see. Board 3 has no control in the material, which is why it comes last. |
| Leads to | |
| Time | About 5 minutes for the first board (our estimate), plus the hand washing. |
| Grouping | One child, at a table |
| Parent prep | Low. A basin of warm water and a towel, or the bathroom sink, before each turn. |
| Cost | Buy about $17 to $62. Make: easy to make at home. |
| Other names | Rough and smooth boards, Tactile boards, Touch board 1, 2 and 3 |
What the work teaches
Direct aim. To feel the difference between rough and smooth with the fingertips, then to feel finer and finer differences.
Indirect aims, the ones you will not see at once
- A light, controlled touch, the same one the sandpaper letters ask for
- Clean hands before handling the material, learned as part of the work
- Words for texture: rough, smooth, and later rougher and smoothest
- Paying attention to one sense with the others quiet, eyes closed
Set it out before you invite the child
Three wooden boards. Nienhuis and Alison's list theirs at 24 by 13 cm.
Board 1 is divided across the middle: one half sandpaper, the other half bare polished wood or very smooth paper. Board 2 has strips of sandpaper and smooth wood side by side, in turn. Board 3 has strips of sandpaper graded from fine to coarse.
Montessori's 1912 book describes the first two boards. Her 1914 handbook adds a board of paper strips 'rough or smooth in different degrees' and a graded series of sandpaper cards. Modern board 3 follows from those.
A small basin of warm water, a bar of soap and a towel, or a sink at child height. Montessori had the child wash with soap, rinse in tepid water and dry the hands gently before any touch work.
A clear table with nothing else on it. A blindfold or soft scarf, for later.
Presentation, step by step
- 1Wash and dry your hands together, slowly, then dip the fingertips in warm water for a few seconds and pat them dry.
- 2Carry board 1 to the table with both hands and lay it down with the rough half on the left.
- 3Hold your writing hand just above the board. Stroke the rough half with the pads of two fingers, top to bottom, as lightly as you can.
- 4Stroke the smooth half the same way. Go back and forth a few times between the two halves.
- 5Take the child's hand by the wrist and guide the two fingertips over the rough half, then the smooth half, barely touching.
- 6Let go, and invite the child to keep going alone.
- 7On a later day, bring board 2. Stroke down each strip in turn, rough, smooth, rough, smooth, across the board.
- 8When boards 1 and 2 are easy, bring board 3 and stroke the strips from the smoothest to the roughest.
Details that hold the child's attention
Warm, damp fingertips, which feel the sandpaper more sharply.
The line across board 1 where rough turns to smooth under one finger.
On board 2, the rhythm of rough, smooth, rough, smooth.
Closing the eyes and still knowing which half is which.
How the child sees a mistake
The child's own fingertips, with the eyes as a check. Board 1 has only two textures, so a child who names them wrong can open their eyes and see. Board 3 has no control in the material, which is why it comes last.
The words come after the hands
| Words | Shown with |
|---|---|
| rough, smooth | The two halves of board 1, given first as a pair. |
| rougher, smoother | Any two strips on board 3. |
| roughest, smoothest | The ends of board 3. |
| fingertips | The pads of the fingers, where the touching happens. |
The three-period lesson, scripted
You need board 1, its rough half and its smooth half.
| Period | What you do and say |
|---|---|
| 1. Naming | Stroke the rough half: "This is rough. Rough, rough." Stroke the smooth half: "This is smooth. Smooth, smooth." |
| 2. Recognition | Wait a moment, then ask "Which is rough? Which is smooth?" The child points or strokes. |
| 3. Recall | Touch one half and ask "What is this?" The child answers "Rough" or "Smooth." |
This is Montessori's own example of a naming lesson, word for word in the 1912 book. If the child gets it wrong she said not to correct, only to stop and give the lesson again another day.
Extensions and variations
- Doing all three boards blindfolded
- Fabric box: pairing squares of cloth by touch, silk with silk, wool with wool
- Touch tablets: pairs of sandpaper cards in five grades, matched with the eyes closed
- A walk around the house to find rough and smooth things: a towel, a window, a brick, a spoon
- Grading the strips of board 3 in words: rough, rougher, roughest
Variations
- A homemade board 1 from a square of fine sandpaper glued to half of a smooth wooden tile
- Starting with the eyes closed from the first day for a child who looks more than they feel
Make it or buy it
| Material | Make it | Buy, approx. |
|---|---|---|
| Touch Boards | Easy | $17 to $62 |
Prices noted . Approximate US street prices for home-use versions; they vary by maker and change often, so recheck before buying.
Making it at home
Glue fine sandpaper over half of a smooth wooden board for board 1, alternating strips for board 2, and strips of five grades from fine to coarse for board 3.
What to check when buying a set
Check that the sandpaper is glued flat to the edges and that the smooth parts are really smooth. A three-board set costs less than a box of touch tablets.
Printables for this age
This work needs only the material, so it has no printable of its own. The shelf plan below places it among the other works for the same age.
- Shelf plan for age 2PDF, 1 page, 325 KBEvery work for this age on one page, in order, with a column to date each presentation.
Every printable for one age, by email
The shelf plan and the lesson printables for your child's age in one email, then three short emails on the first lesson, what to make or buy, and what comes next.
Signs the child is ready, and signs it is done
Ready for the first presentation
- Washes and dries their hands with a little help.
- Can hold a hand still in the air for a few seconds.
- Touches gently when shown, without scratching or rubbing hard.
- Sits at a table for a short lesson.
Ready for the next lesson
- Names rough and smooth on board 1 with the eyes closed.
- Strokes every board with a light, even touch, unprompted.
- Puts board 3's strips in order of roughness by feel.
- Names rough and smooth surfaces around the house without being asked. That's the cue for the sandpaper letters.
Fitting it into a home, not a classroom
| If you have | Do this |
|---|---|
| No boards yet | Glue fine sandpaper over half of a smooth wooden or cardboard square. That's board 1, and it does most of the work. |
| A toddler sibling | Boards are safe in small hands, but sandpaper grazes skin when rubbed hard. Let the toddler feel it with you, gently, then put it up high. |
| No sink the child can reach | A basin of warm water, a bar of soap and a towel on a low table. Montessori's handbook does the hand washing at a table, too. |
| Two children | One closes their eyes and strokes; the other says which half it is. Swap after three turns. |
When it does not go to plan
| When | Try this |
|---|---|
| The child scrubs the sandpaper hard. | Take their hand and show the hover again, the fingers barely brushing. A hard rub feels the same on both halves. |
| Rough and smooth get mixed up. | Stop without comment and give the lesson again another day. Montessori's rule: no correction, just a repeat. |
| The child skips washing. | Make the washing part of the work, every time. Montessori tied clean hands to touching the material. |
| Board 3 seems pointless to them. | Close the eyes. Graded strips are hard to feel and easy to see, so looking takes the interest away. |
Hazards to check before each session
Coarse sandpaper scrapes skin. Check homemade boards for loose grit and sharp edges.
Warm water, not hot. Test it on your own wrist first.
Where other sequences and standards place it
We have not bought the paid homeschool curricula, so they are not listed here.
| Framework | Where it sits |
|---|---|
| This site's Sensorial sequence | Lesson 4 of 12 published, after Hand Washing, before Mystery Bag (Stereognostic Bag). Checked in: the scope and sequence |
| Montessori, The Montessori Method (1912) | The first tactile material: a board half smooth and half sandpaper, then a board of alternating strips, after the hands are washed in warm water. Rough and smooth come once the attention is caught by the size materials. Checked in: Chapter XIII; Chapter XX, Sequence of Exercises |
| Montessori, Dr. Montessori's Own Handbook (1914) | The board with rough and smooth surfaces, the board with gummed strips in different degrees, and graded sandpaper cards, given in the same period as the cubes, prisms and rods. Checked in: Sensory Education, Figs. 13 and 14 |
| Head Start Early Learning Outcomes Framework, preschool | P-SCI 3: the child compares and categorizes observable phenomena, here by texture. Checked in: www.in.gov |
Touch boards: questions parents ask
What are Montessori touch boards?
Three wooden boards for the sense of touch. Board 1 is half sandpaper and half smooth, board 2 has alternating rough and smooth strips, and board 3 has strips graded from fine to coarse. The child strokes them with light fingertips after washing their hands.
What age are touch boards for?
About 2.5 to 3 for board 1, and on this site the work runs to 4.5. Montessori brought in rough and smooth once a child could hold attention on the size materials.
Why wash hands before the touch boards?
Montessori gave two reasons: warm water makes the fingertips more sensitive, and the child learns not to handle things with dirty hands. The washing is part of the lesson.
Are touch boards the same as touch tablets?
No. The boards are three single pieces that show the difference between rough and smooth. Touch tablets are pairs of small sandpaper cards in several grades, matched by feel. Tablets come after the boards.
Sources cited by book and chapter
- Maria Montessori, The Montessori Method (1912)
Chapter XIII, Education of the Senses
The tactile material is a rectangular wooden board divided into two equal rectangles, one covered with very smooth paper or polished wood and the other with sandpaper, and a second tablet covered with alternating strips of smooth paper and sandpaper.
The child washes his hands with soap in a little basin, rinses them in tepid water and dries them, and is taught to touch by having his finger drawn very, very lightly over the surface.
The child is taught to hold his eyes closed while he touches, being told that he will feel the differences better.
Chapter XV, Intellectual Education
Touching the smooth and rough cards in the first tactile exercise, the teacher says "This is smooth. This is rough," repeating the words with varying modulations of the voice.
If the child makes a mistake in the test, the teacher must not correct him but must suspend the lesson and take it up again another day.
Children who have touched the smooth and rough cards a few times spontaneously touch the surfaces about them, repeating "Smooth! Rough!".
Chapter XX, Sequence of Exercises
When the education of the attention has begun, the rough and smooth surfaces may be presented, after the dimension materials.
- Maria Montessori, Dr. Montessori's Own Handbook (1914)
Sensory Education
The child passes the soft cushioned tips of his fingers as lightly as possible over the two surfaces, the suspended hand moving delicately backwards and forwards.
The teacher takes hold of the child's hand and guides it to touch the surfaces with the fingertips, making no explanations, her words only encouraging him.
Sensory Education, Fig. 14
After the board with the two contrasting surfaces comes a board with gummed strips of paper rough or smooth in different degrees, and graduated series of sandpaper cards.
Writing
Children touch the sandpaper letters with the hand raised as when they lightly touched the rough and smooth surfaces.
Reviewed by
What to offer next
Once the child chooses this work unprompted and finishes it without help, the next lesson to prepare is Mystery Bag (Stereognostic Bag).
- Pink Tower2.5 to 4 years
- Brown stair2.5 to 4.5 years
- Touch boards2.5 to 4.5 years
- Red rods3 to 5 years
- Color tablets3 to 5 years