Touch Boards
Touch boards are three wooden boards for the first lessons in touch: one half sandpaper and half smooth, one in alternating strips, one in strips graded fine to coarse. They suit children of about 2.5 to 4.5. Sets cost $16.95 to $62.00 at the US sellers we checked on October 5, 2026, and a homemade set takes an evening.
The first lesson with it is Touch Boards (Rough and Smooth Boards). Not sure your child is ready for it? Two minutes of questions place your child on the sequence.
| Area | Sensorial |
|---|---|
| Used in | |
| From age | 2.5 to 4.5 years |
| Make it | Easy to make at home |
| Buy it | About $17 to $62 (noted ) |
What the touch boards are for
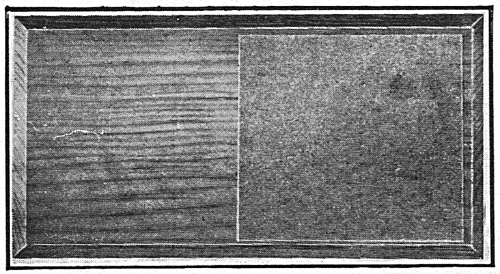
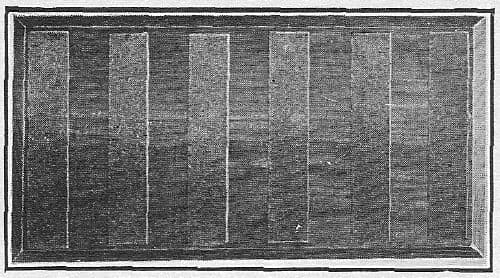
The boards give the fingertips one thing to notice: how rough or smooth a surface is. Everything else about them is the same, so the difference stands out. The child washes and dries their hands first and strokes each board as lightly as possible.
Montessori's 1912 book describes the first two boards: one divided into a smooth half and a sandpaper half, and one of alternating strips. Her 1914 handbook adds a board of strips graded in roughness. Modern sets keep that order.
| Part | What it looks like |
|---|---|
| Board 1 | Half sandpaper, half smooth wood |
| Board 2 | Alternating strips of sandpaper and smooth wood |
| Board 3 | Strips of sandpaper graded from fine to coarse |
| Size | 24 by 13 cm per board at Nienhuis and Alison's |
| Extras | Alison's premium set adds a fourth board, splitting the graded strips into a smooth set and a rough set |
The lessons that use the touch boards
Touch Boards (Rough and Smooth Boards)
2.5 to 4.5 yearsFeeling the difference between rough and smooth with washed, light fingertips on three wooden boards, the first exercise for the sense of touch.
Buying one: 3 listings checked October 5, 2026
| Seller and set | Made of | Price |
|---|---|---|
| Montessori OutletRough and Smooth Boards (510300170)Three boards: contrast, alternating strips, graded strips. Market price shown $42.00. In stock. | Sandpaper on wooden boards | $16.95 |
| NienhuisRough And Smooth Boards Set (0012A0)Three boards, 24 by 13 cm each. US store price. | Beech and sand | $42.85 |
| Alison's MontessoriRough and Smooth Boards, Premium Quality (PS08)Four boards, 24 by 13 cm, with a storage box: half and half, alternating strips, five graded smooth strips, five graded rough strips. Made in Sri Lanka. | Wood with sandpaper strips | $62.00 |
- Montessori Outlet's three boards at $16.95 cover the lesson. Nienhuis's set is the same three boards in beech.
- Alison's four-board set splits the graded strips in two. That's a nice extra, not a need.
- Board 1 does most of the work. If you buy nothing else, a homemade board 1 is enough to start.
- The Montessori Room sells touch tablets rather than boards, and Montessori Services had neither, so neither is in the table.
Making the touch boards at home
What to gather
- Three smooth boards or squares of thick card, about 24 by 13 cm
- Sandpaper in four or five grades, from very fine (about 400 grit) to coarse (about 60 grit)
- Wood glue or a glue stick made for paper and wood
- A craft knife, a metal ruler and a cutting mat
- Fine sandpaper to smooth the edges, and clear matte varnish for the bare wood
| Piece | Size and marking | How many |
|---|---|---|
| Board 1 sandpaper | 12 by 13 cm, medium grit, covering half the board | 1 |
| Board 2 strips | 2.5 by 13 cm, medium grit, glued with 2.5 cm gaps | 5 |
| Board 3 strips | 4 by 13 cm, one of each grit from fine to coarse | 5 |
- 1Sand the boards smooth and varnish them. The smooth parts have to feel clearly smooth.
- 2Glue the half sheet to board 1, edge to the middle line, pressing out every bubble.
- 3Glue the five strips to board 2 with a smooth gap the same width between each.
- 4Glue the graded strips to board 3, finest at one end and coarsest at the other.
- 5Weight the boards flat overnight, then trim any overhang with the craft knife.
Keeping a full set on the shelf
- Keep the boards flat and dry. Damp sandpaper curls at the edges and loses its grit.
- Brush off loose grit now and then, and replace a strip that has worn smooth.
Questions parents ask about the touch boards
What are Montessori rough and smooth boards?
Three wooden boards with sandpaper on them, used for the first lessons in touch. The child feels the difference between rough and smooth with light, washed fingertips, then finer differences between grades of sandpaper.
Can I make touch boards?
Yes, easily. Glue sandpaper to half of a smooth board for board 1, alternating strips for board 2, and five grades side by side for board 3. The build above has the sizes.
What comes after the touch boards?
Touch tablets and the fabric box for finer differences, and the sandpaper letters, which ask for the same light touch with two fingers.
Before the touch boards, make sure the work before it is solid. The hand washing lesson lists the signs that a child is ready to move on.