Geometric Cabinet (Plane Geometric Insets)
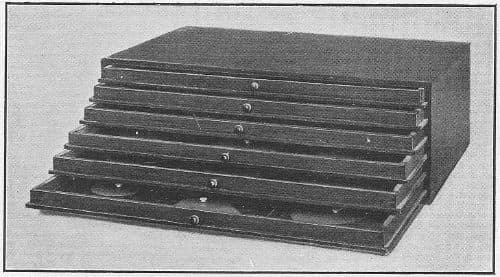
The geometric cabinet is a wooden chest of six drawers holding about 35 flat blue shapes, each set in its own square frame with a small knob. A child of about 3 lifts a shape out, traces its edge and the empty frame with two fingers, and puts it back. Three very different shapes come first; drawers of similar shapes follow.
Sourced from the texts, not yet presented at home
| Typical age | 3 to 5 years |
|---|---|
| Area | Sensorial |
| Before this | |
| Materials | |
| Direct aim | To see and feel differences of shape, and later to learn the names of plane figures. |
| Control of error | The frame. Each shape enters only its own opening, so a wrong choice simply won't drop in, and the child sees why. Montessori called the control absolute here. On the cards it moves to the eye: the wooden shape has to cover the printed one exactly. |
| Leads to | |
| Time | About 10 minutes (our estimate). |
| Grouping | One child at a table |
| Parent prep | Low. Choose the shapes for the tray before the child arrives. |
| Cost | Buy about $180 to $543. Make: hard to make accurately. |
| Other names | Plane geometric insets, Geometric insets, Geometric demonstration tray, Geometry cabinet |
What the work teaches
Direct aim. To see and feel differences of shape, and later to learn the names of plane figures.
Indirect aims, the ones you will not see at once
- Preparation for writing: two fingers following a closed outline, the movement later made with a pencil
- A pincer grip on a small knob
- Words for shapes, from circle and square to trapezoid and decagon
- Noticing the same shapes in the room: windows, doors, plates, a slice of bread
Set it out before you invite the child
A wooden cabinet of six drawers. Each drawer holds six square frames, and almost every frame has a blue shape with a small knob. Montessori Outlet's cabinet has 35 pieces: six circles, six rectangles, seven triangles, six polygons, four curved figures, six quadrilaterals and one blank frame.
A demonstration tray that holds six frames, for the first lessons. Montessori's 1912 tray measured 30 by 20 cm and was painted dark blue, with plain wooden squares to fill the spaces not in use.
Montessori's own drawers held a square with five rectangles of the same length and shrinking width, six circles, six triangles, polygons from the pentagon to the decagon, and curved figures. The modern cabinet keeps those groups.
Three series of white cards printed with the same shapes at the same size: filled in blue, then a thick blue outline, then a thin black line. They come after the frames.
A table, with room below the tray to lay the shapes out.
Presentation, step by step
- 1Set up the tray with a circle, a square and a triangle. Fill the other spaces with plain squares and carry it to the table.
- 2Lift the circle out by its knob with the thumb and two fingers, and lay it below the tray.
- 3Trace the edge of the circle slowly with the index and middle fingers, all the way round.
- 4Trace the inside edge of the empty frame the same way. Then drop the circle back in.
- 5Do the same with the square, stopping at each corner and running along each side.
- 6Do the same with the triangle.
- 7Take all three out, lay them on the table out of order, and invite the child to trace and replace them.
- 8Over later lessons, add more contrasting shapes, then fill the tray from one drawer of similar shapes: six circles, or the square and five rectangles.
Details that hold the child's attention
A rectangle that won't go in sideways, beside a square that goes in any way you turn it.
The circle, which fits however it's turned.
The oval, which fits only one way round, big curve to big curve.
Two fingertips running into a corner and changing direction.
How the child sees a mistake
The frame. Each shape enters only its own opening, so a wrong choice simply won't drop in, and the child sees why. Montessori called the control absolute here. On the cards it moves to the eye: the wooden shape has to cover the printed one exactly.
The words come after the hands
| Words | Shown with |
|---|---|
| circle, square, triangle | The first three, given with the demonstration tray. |
| rectangle | With the square, for the second drawer. |
| oval, ellipse | For the curved figures, once the child can tell them apart in the frames. |
| pentagon to decagon | The polygons, five to ten sides. Give them when the child asks. |
| frame | The square the shape sits in. |
The three-period lesson, scripted
You need the square and the circle, two strongly contrasting forms.
| Period | What you do and say |
|---|---|
| 1. Naming | Trace the square: "This is a square." Trace the circle: "This is a circle." |
| 2. Recognition | "Give me the square." "Put the circle in its frame." Mix them and ask again. |
| 3. Recall | Point to one and ask "What is this?" |
Montessori's 1912 book starts the names with the square and the circle, once the child places the insets with ease, and gives only the familiar names. Her 1914 handbook reports that children wanted all of them, trapezium and decagon included.
Extensions and variations
- Matching the wooden shapes to the three series of cards: filled, thick outline, thin line
- Laying out the cards from all three series and placing each wooden shape on its three matches as fast as possible
- Tracing and replacing with the eyes closed, a game Montessori's children invented themselves
- Finding the shapes in the house: a rectangular table, a round plate, a triangle of toast
- Tracing a frame's outline with a pencil on paper, which leads to the metal insets
Variations
- Presenting one drawer at a time once the contrasting shapes are easy
- A three-shape tray only, for a child under 3
Make it or buy it
| Material | Make it | Buy, approx. |
|---|---|---|
| Geometric Cabinet | Hard to make accurately | $180 to $543 |
Prices noted . Approximate US street prices for home-use versions; they vary by maker and change often, so recheck before buying.
Making it at home
Cut shapes from thick card or plywood, trace each onto a second card, and keep three cards per shape: filled, thick outline, thin line. A full wooden cabinet is not worth making.
What to check when buying a set
Check that every shape drops into its frame without sticking and that the knobs are firm. The demonstration tray alone covers the first lessons.
Printables for this age
This work needs only the material, so it has no printable of its own. The shelf plan below places it among the other works for the same age.
- Shelf plan for age 3PDF, 1 page, 250 KBEvery work for this age on one page, in order, with a column to date each presentation.
Every printable for one age, by email
The shelf plan and the lesson printables for your child's age in one email, then three short emails on the first lesson, what to make or buy, and what comes next.
Signs the child is ready, and signs it is done
Ready for the first presentation
- Places all the knobbed cylinders in one block without trial fits.
- Lifts a small knob between the thumb and two fingers.
- Follows an outline with a fingertip when shown.
- Watches a slow presentation to the end.
Ready for the next lesson
- Places the shapes of any drawer with no trial fits.
- Traces each shape and frame before replacing it, without reminders.
- Matches the wooden shapes to the thin-line cards.
- Points out shapes in the house and names them. That's the cue for the metal insets.
Fitting it into a home, not a classroom
| If you have | Do this |
|---|---|
| A tight budget | Buy the demonstration tray or a single drawer's worth of shapes first. Most of the early lessons need only three to six pieces. |
| A toddler sibling | The knobs are small and the smallest circles fit in a mouth. Use the tray at a table and count the pieces back. |
| No cabinet at all | Cut shapes from thick card, trace them onto a second card, and use the three-card idea: filled, thick outline, thin line. |
| A child who knows the names already | Go straight to the drawers of similar shapes. The fine differences are the real work. |
When it does not go to plan
| When | Try this |
|---|---|
| The child jams a rectangle in across the opening. | Show the tracing again: the inset, then the frame. Montessori saw children place a shape at once after touching both outlines. |
| The shapes go back without any tracing. | Present again, slower, and guide the child's two fingers yourself the first time. The handbook asks the adult to do exactly that. |
| Interest fades after one tray. | Expected. Montessori rarely saw a child repeat this more than five or six times in a sitting. Change the shapes another day. |
| Knobs come loose. | Glue them back before the next lesson. A shape with no knob gets pried out by its edges. |
Hazards to check before each session
The smallest circles and the knobs are choking-size for a child under 3. Count the pieces back into the tray.
Carry the drawers flat. A tipped drawer drops six pieces at once.
Where other sequences and standards place it
We have not bought the paid homeschool curricula, so they are not listed here.
| Framework | Where it sits |
|---|---|
| This site's Sensorial sequence | Lesson 8 of 12 published, after Knobbed Cylinders, before Geometric Solids and Fraction Insets (Fraction Circles) and Metal Insets and Botany Cabinet: Leaf Shapes. Checked in: the scope and sequence |
| Montessori, The Montessori Method (1912) | Plane geometric insets in a tray and a six-drawer case, with three series of cards. Presented in the third grade alongside the gradations of color and touch. Checked in: Chapter XIII, Education of the Sense of Vision; Chapter XX |
| Montessori, Dr. Montessori's Own Handbook (1914) | A cabinet of six drawers of insets grouped by likeness, a frame for the first presentation, and three series of cards. Checked in: Sensory Education, Figs. 16 to 25 |
| Common Core, Kindergarten math | K.G.A.2: correctly name shapes regardless of their orientations or overall size. Checked in: tasks.illustrativemathematics.org |
| Head Start Early Learning Outcomes Framework, preschool | P-MATH 9: the child identifies, describes, compares and composes shapes. Checked in: www.in.gov |
Geometric cabinet: questions parents ask
What is the Montessori geometric cabinet?
A small chest of six drawers holding flat wooden shapes, each fitted into a square frame with a knob to lift it. The drawers group like shapes together: circles, rectangles, triangles, polygons, curved figures. A tray holds the first few shapes for the opening lessons.
What age is the geometric cabinet for?
About 3, once the knobbed cylinders are easy, and on this site it runs to 5. Montessori placed the insets alongside the color and touch gradations, and wrote that even the younger children could do the first tray.
Why trace the shapes with two fingers?
Montessori found that children who couldn't place a shape by looking could place it after feeling its edge and the frame's. The tracing also trains the hand to follow an outline, ready for the metal insets and writing.
Should children learn all the shape names?
Start with the shapes everyone knows. Montessori's 1912 book stops at the familiar names, but her 1914 handbook says children asked for all of them and enjoyed words like trapezium and decagon. Follow the child.
Sources cited by book and chapter
- Maria Montessori, The Montessori Method (1912)
Chapter XIII, Education of the Sense of Vision
A rectangular tray 30 by 20 centimetres, painted dark blue, holds six square frames with their insets, and blank wooden squares let as few as two or three forms be presented at a time.
A case of six drawers holds six small frames each: plain squares with a rhomboid and a trapezoid, a square with five rectangles of the same length but varying width, six circles, six triangles, five polygons from pentagon to decagon, and six curved figures.
At first children place the insets only after many attempts, putting a rectangle with its long side across the short side of the opening, but after three or four lessons they place them with ease.
The child touches the contour of the piece with the index finger and then the contour of the frame, and children confused about where a figure goes place it perfectly once they have touched both contours.
In the exercise with the insets the control is absolute, since the figure can only enter the corresponding frame, so the child can work by himself.
Chapter XV, Intellectual Education
Lessons in nomenclature begin with two strongly contrasted forms, the square and the circle, and the square enters its frame however it is turned while a rectangle placed across the opening will not.
Chapter XX, Sequence of Exercises
The child passes to the plane geometric insets in metal, follows the contours with a pencil and fills in the figures.
- Maria Montessori, Dr. Montessori's Own Handbook (1914)
Sensory Education
The first figures in the frame are very different, such as the circle and the equilateral triangle, with plain tablets in the other spaces, and later figures similar to one another are arranged together.
The child touches the outline of the inset and of the corresponding aperture with the soft tips of the index and middle fingers before putting the inset back.
Children wanted to learn all the names of the forms, even the most difficult such as trapezium and decagon, rather than only square, rectangle and circle.
The children themselves invented the exercise of blindfolding their eyes to recognize the forms by touch, taking out and putting back the insets without seeing them.
Sensory Education, Fig. 25
Three series of white cards repeat the forms at the same size: filled in with blue paper, outlined with a strip of blue paper, and outlined only in black ink.
Reviewed by
What to offer next
Once the child chooses this work unprompted and finishes it without help, the next lesson to prepare is Geometric Solids.
- Color tablets3 to 5 years
- Sound cylinders3 to 5 years
- Geometric cabinet3 to 5 years
- Mystery bag3 to 5.5 years
- Binomial Cube3.5 to 6 years