Metal Insets
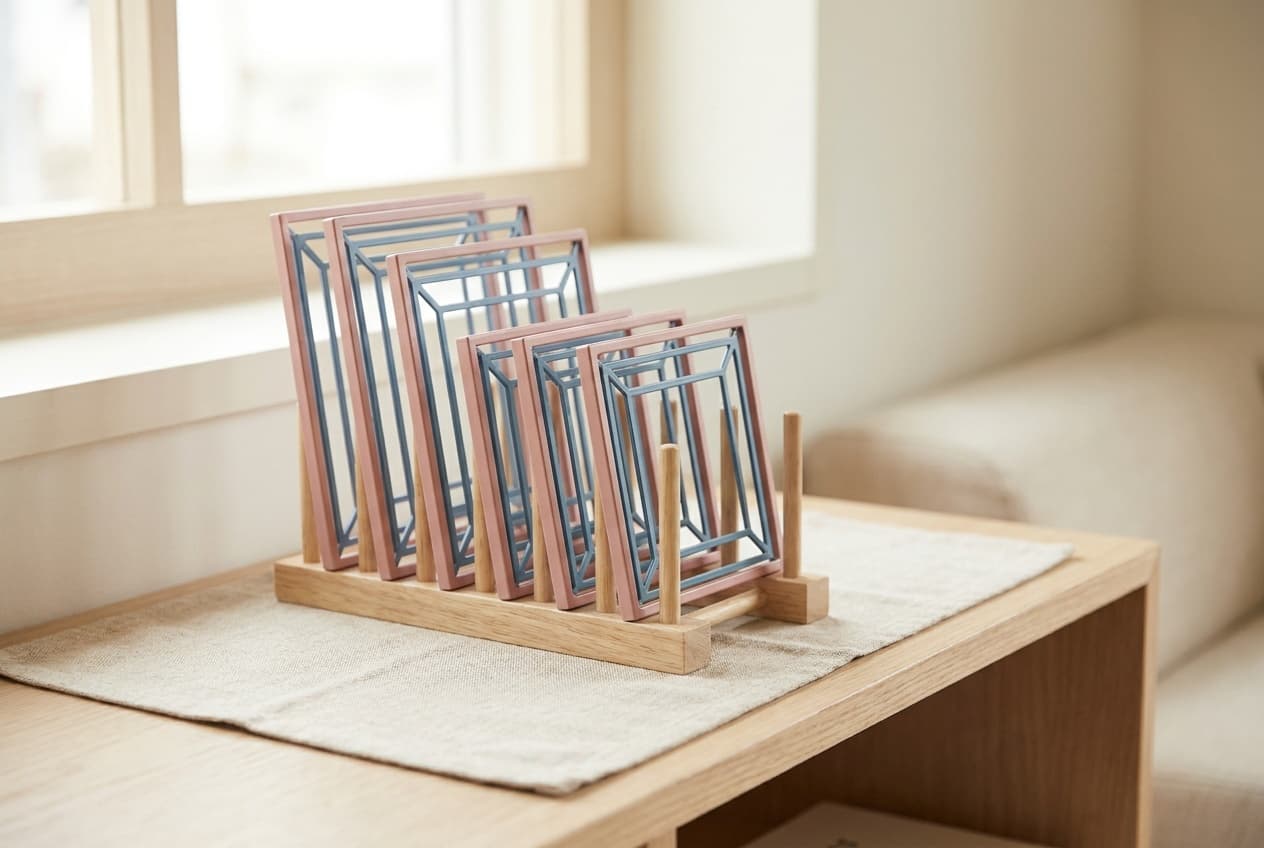
Metal insets are ten pink metal frames, each holding a blue geometric shape with a small knob. A child of about 3.5 traces the inside of a frame, then the shape itself, in two colors, and fills the figure with careful strokes. Montessori counted one filled figure as much hand practice as ten copybook pages of strokes.
Sourced from the texts, not yet presented at home
| Typical age | 3.5 to 6 years |
|---|---|
| Area | Language |
| Before this | |
| Materials | |
| Direct aim | To control a pencil: tracing an outline, then filling a shape with even, parallel strokes. |
| Control of error | The frame and the outline. The metal edge guides the pencil, and when filling, any stroke that crosses the line shows. Montessori read a child's pencil control from the strokes, which start short and confused and grow long and parallel, inside the line. |
| Leads to | Later lessons in this line are in preparation. |
| Time | About 15 minutes (our estimate). |
| Grouping | One child at a table |
| Parent prep | Low. The insets on their stand, a small tray, paper cut square, and colored pencils. |
| Cost | Buy about $57 to $194. Make: possible to make with some effort. |
| Other names | Iron insets, Metal geometric insets, Insets for design |
What the work teaches
Direct aim. To control a pencil: tracing an outline, then filling a shape with even, parallel strokes.
Indirect aims, the ones you will not see at once
- Preparation for writing: the three-finger grip and light, steady pressure
- Shape names and an eye for geometric figures
- Choosing colors and putting them together
- Concentration, and care with paper and pencils
Set it out before you invite the child
Ten metal frames, each with a blue inset that lifts out by a small knob. Montessori Outlet, Nienhuis and The Montessori Room all list pink frames and blue shapes; Alison's lists each inset at 5.5 inches square.
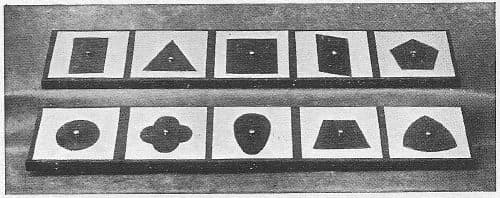
Montessori's 1914 set looks much the same: ten pink metal frames with blue figures, set out on two sloping boards of five, with a box of ten colored pencils. Her 1912 set had brown frames with dark blue centers, on two small sloping tables.
Most albums add a small tray, paper cut to the size of the frame, and a holder for three pencils. That's later practice, and it keeps the frame square on the paper.
A table and chair, with the stand where the child can see all ten shapes at once.
Presentation, step by step
- 1Invite the child to the stand. Choose the square or the circle, and carry frame and inset to the table on a tray with paper and pencils.
- 2Lay the frame on the paper. Hold it down with a flat hand and trace the inside edge with a colored pencil, slowly, all the way round.
- 3Lift the frame. Lay the blue inset on the drawn shape and trace around it in a second color.
- 4Lift the inset away. The figure now has two outlines in two colors.
- 5Fill the figure with strokes from one line to the other, each stroke staying inside the outline.
- 6Invite the child to make one, then return the frame and inset to the stand.
Details that hold the child's attention
Lifting the frame and finding a shape drawn on the paper.
Two outlines in two colors, one inside the other.
The knob. Montessori saw children add a small orange circle in the middle of their drawings to stand for it.
A drawer slowly filling with the child's own figures.
How the child sees a mistake
The frame and the outline. The metal edge guides the pencil, and when filling, any stroke that crosses the line shows. Montessori read a child's pencil control from the strokes, which start short and confused and grow long and parallel, inside the line.
The words come after the hands
| Words | Shown with |
|---|---|
| frame | The pink square with the shape cut out. |
| inset | The blue shape that fits it. |
| outline | The line the pencil leaves around a shape. |
| square and circle | The first two shape names, given once the child has drawn both. |
The three-period lesson, scripted
You need the square and the circle insets.
| Period | What you do and say |
|---|---|
| 1. Naming | "This is a square." "This is a circle." |
| 2. Recognition | "Give me the circle." "Give me the square." |
| 3. Recall | Point to one and ask "What is this?" |
Montessori began shape names with the square against the circle, two strongly contrasted forms, and taught only the familiar ones.
Extensions and variations
- Combining two insets in one drawing, overlapping or one inside the other
- Using a frame and an inset of different shapes together
- Filling with strokes in a new direction, or with short strokes
- Coloring outline designs, as in the book of drawings Montessori prepared
- Binding the child's best figures into a small booklet
Variations
- Starting with straight-sided shapes, which are easier to trace than curves (our suggestion)
Make it or buy it
| Material | Make it | Buy, approx. |
|---|---|---|
| Metal Insets | With effort | $57 to $194 |
Prices noted . Approximate US street prices for home-use versions; they vary by maker and change often, so recheck before buying.
Making it at home
Frames and shapes cut from stiff card or thin plastic make a working set. Metal is easier to trace and lasts.
What to check when buying a set
Check edges for burrs and that each inset lifts out cleanly by its knob. Stands are useful but optional.
Printables for this age
This work needs only the material, so it has no printable of its own. The shelf plan below places it among the other works for the same age.
- Shelf plan for age 3PDF, 1 page, 250 KBEvery work for this age on one page, in order, with a column to date each presentation.
Every printable for one age, by email
The shelf plan and the lesson printables for your child's age in one email, then three short emails on the first lesson, what to make or buy, and what comes next.
Signs the child is ready, and signs it is done
Ready for the first presentation
- Holds a pencil with three fingers.
- Works the knobbed cylinders with a careful pincer grip.
- Colors inside a large shape on paper.
- Sits at a table for ten minutes.
Ready for the next lesson
- Traces frame and inset without the frame slipping.
- Fills a figure with even, parallel strokes inside the line.
- Combines two insets in a design, unprompted.
- Asks to write letters on paper.
Fitting it into a home, not a classroom
| If you have | Do this |
|---|---|
| A tight budget | Cut frames and shapes from stiff cardboard or thin plastic, such as a lid. A metal edge is easier to trace, but card works for a start. |
| A left-handed child | Set the pencils and the stand on the left, and show the tracing with your left hand if you can. |
| A toddler sibling | Pencils and metal frames aren't toddler tools. Use the insets while the toddler naps. |
| Little table space | One frame, one sheet and three pencils on a tray is the whole work. The stand can live on a shelf. |
When it does not go to plan
| When | Try this |
|---|---|
| The frame slides while the child traces. | Show the flat hand holding it down again. A sheet of non-slip mat under the paper helps. |
| The child scribbles instead of filling. | Leave it. Montessori saw first fillings as short, confused strokes that grew longer and more even with practice. |
| The pencil point keeps breaking. | Show a light stroke again, slowly. Pressure eases with practice. |
| The child only ever chooses the circle. | Let them. Keep all ten shapes on show in a row: Montessori found children wanted to draw every inset they could see. |
Hazards to check before each session
Check the frames and insets for sharp corners or burrs, especially on budget sets.
Draw sitting down, and carry pencils point down.
Where other sequences and standards place it
We have not bought the paid homeschool curricula, so they are not listed here.
| Framework | Where it sits |
|---|---|
| This site's Language sequence | Lesson 4 of 12 published, after Knobbed Cylinders and Geometric Cabinet (Plane Geometric Insets). Checked in: the scope and sequence |
| Montessori, The Montessori Method (1912) | Fourth grade: the child passes to the geometric insets in metal, traces them with a pencil and fills them in, while starting the sandpaper letters. Checked in: Chapter XX, Sequence of Exercises |
| Montessori, Dr. Montessori's Own Handbook (1914) | Writing, the management of the instrument: two sloping boards of five pink frames with blue figures, ten colored pencils, a book of designs. Checked in: Writing, Fig. 28 |
| Common Core, Kindergarten math | K.G.A.2: correctly name shapes regardless of their orientations or overall size. Checked in: tasks.illustrativemathematics.org |
| Head Start Early Learning Outcomes Framework, preschool | P-PMP 3: the child demonstrates increasing control, strength and coordination of small muscles. Checked in: www.in.gov |
Metal Insets: questions parents ask
What are metal insets in Montessori?
Ten metal frames, each with a geometric shape that lifts out by a knob. The child traces the frame and the shape onto paper and fills the figure with pencil strokes. It's preparation for writing, done with drawing.
What age are metal insets for?
About 3.5, once the child holds a pencil with three fingers, and on this site up to 6; older children keep using them for designs. Montessori placed them in her fourth grade of exercises, alongside the first sandpaper letters.
Why do metal insets help with writing?
They train the pencil hand without the strain of forming letters. Montessori found that filling one figure made the child repeat the writing movement as often as ten copybook pages of strokes, and the strokes grew even with practice.
Do I need the stands?
No. They display the ten shapes in a row, which Montessori found made children want to draw them all. A shelf where all ten can be seen does the same.
Sources cited by book and chapter
- Maria Montessori, Dr. Montessori's Own Handbook (1914)
Writing, Fig. 28
Two sloping wooden boards each hold five square metal frames colored pink, with a blue geometrical figure provided with a small button for a handle, used with a box of ten colored pencils.
Writing
The child lays the iron frame on the paper, holds it down firmly and follows the interior outline with a colored pencil, then places the blue figure on the outline and draws round it in another color.
Holding a pencil like a pen, the child fills the figure with up and down strokes, at first clumsy and outside the outlines, later finer, parallel and within them.
When the ten metal insets are arranged in a row before the child, rather than handed out, he wants to draw them all, and the number of exercises increases.
- Maria Montessori, The Montessori Method (1912)
Chapter XVII, Description of the Method and Didactic Material Used
The top of each little sloping table holds square frames painted brown with centres of the same dark blue as the metal insets.
Filling in one figure makes the child repeat the movement needed to fill ten copybook pages with vertical strokes, without weariness.
Many children make a little orange circle in the centre of the figure to represent the brass button by which the metal piece is held.
The strokes grow longer and more nearly parallel until the figures are filled with regular up and down strokes, which shows the child's maturity in holding the pencil.
Chapter XX, Sequence of Exercises
The child passes to the plane geometric insets in metal, follows the contours with a pencil and fills in the figures, and contemporaneously learns some sandpaper letters.
Chapter XV, Intellectual Education
Lessons in the names of forms begin with two strongly contrasted forms, the square and the circle, and only the most familiar names are taught.
Reviewed by
What to offer next
Once the child chooses this work unprompted and finishes it without help, the next lesson to prepare is Pink Series: Object Box Reading.
- Sound games2.5 to 4.5 years
- Moveable alphabet3.5 to 6 years
- Metal Insets3.5 to 6 years
- Pink series4 to 6 years
- Three-part cards4 to 6.5 years