Dry Pouring Between Two Pitchers
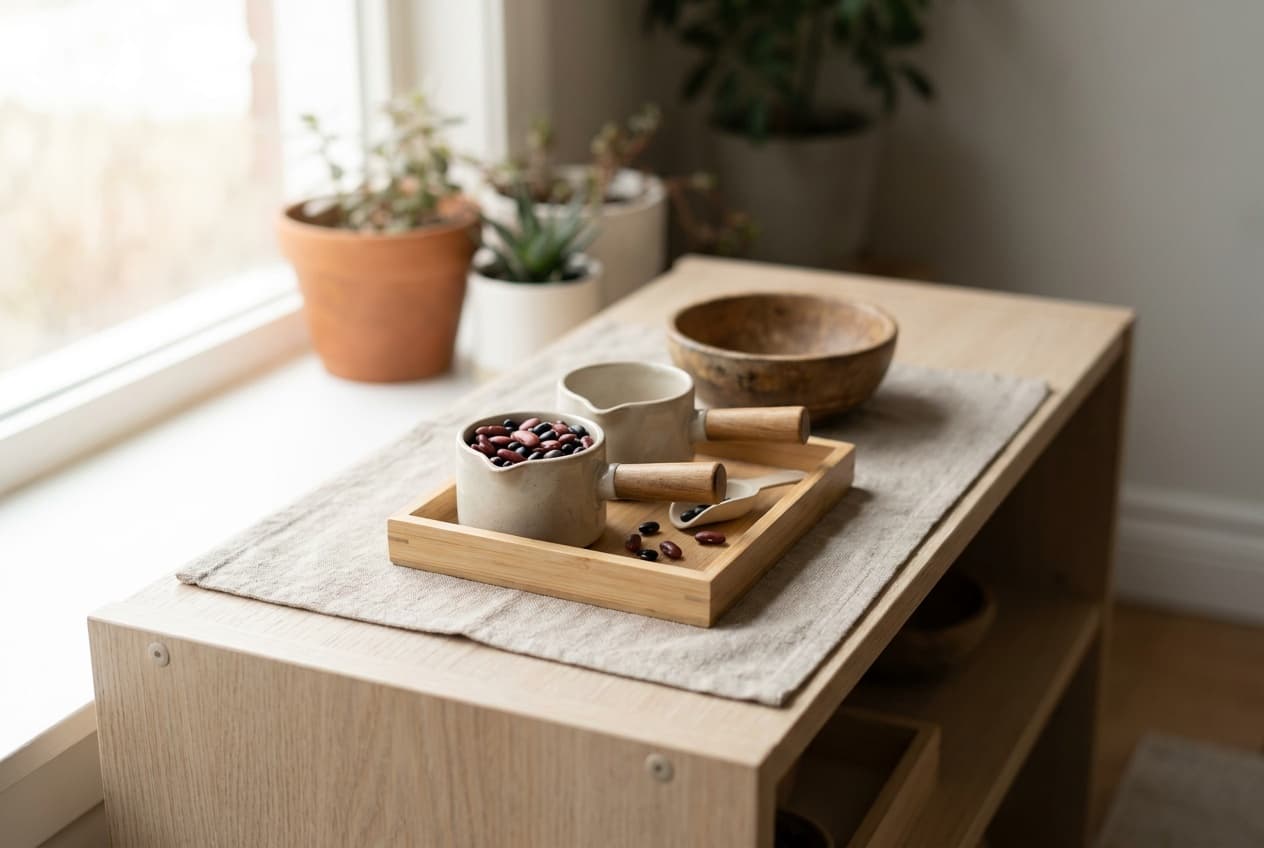
Two small pitchers, a rimmed tray and a third of a pitcher of rice or large dried beans make the first pouring lesson. The child pours from the full pitcher into the empty one and back again, and any grain that misses lands on the tray. It suits children from about 18 months, before pouring water.
Sourced from the texts, not yet presented at home
| Typical age | 18 months to 3.5 years |
|---|---|
| Area | Practical Life |
| Before this | Nothing. This lesson can come first. |
| Materials | |
| Direct aim | To pour a dry material from one pitcher to another without spilling. |
| Control of error | Spilled grains on the tray show immediately where the pour went wrong, and the tray keeps them contained so the child can pick them up and try again. |
| Leads to | |
| Time | Under 5 minutes to present (our estimate): one pour across, one pour back. |
| Grouping | One child |
| Parent prep | Low. Two pitchers, a tray and a cup of rice or beans. |
| Cost | Buy about $8 to $34. Make: easy to make at home. |
| Other names | Pouring grains, Pitcher to pitcher pouring, Dry transfer with pitchers |
What the work teaches
Direct aim. To pour a dry material from one pitcher to another without spilling.
Indirect aims, the ones you will not see at once
- Control of the wrist and hand movement used later for liquid pouring
- Concentration and visual tracking
- Left-to-right movement that prepares for reading and writing
- Independence in serving food and drink
Set it out before you invite the child
Two matching pitchers of about 200 to 250 ml, each light enough to lift by the handle with one hand. Small creamer jugs fit.
A rimmed tray roughly 30 by 20 cm, wide enough that a stray grain stays on it.
Fill one pitcher a third full. A fuller pitcher is heavy for a first pour and spills over the lip.
Large dried beans or chickpeas for a child under 2; rice once the pour is steady.
Full pitcher on the left, empty one on the right, both handles turned toward the child's pouring hand.
Presentation, step by step
- 1Carry the tray to the table with both hands and sit so the child is on your dominant-hand side.
- 2Name the material: "These are two pitchers. One has rice in it." Place the full pitcher on the left and the empty one on the right.
- 3Grasp the handle of the full pitcher with your dominant hand. Rest two fingers of the other hand under the spout to steady it.
- 4Lift the full pitcher slightly, bring the spout to the center of the empty pitcher's opening, and tip it slowly until all the rice has moved across.
- 5Set the empty pitcher down. Pause so the child can see that the rice is now in the right-hand pitcher.
- 6Swap the pitchers' positions so the full one is on the left again, and repeat the pour.
- 7If a grain spills, pick it up with your fingers and drop it back in, without comment.
- 8Offer the work: "Would you like a turn?" When finished, carry the tray back to the shelf.
Details that hold the child's attention
The sound of the grains hitting the empty pitcher, which changes as it fills.
The last few grains that cling to the bottom, and waiting for them to slide out.
A single spilled grain on the tray, picked up between thumb and finger.
The full pitcher becoming the empty one, every turn.
How the child sees a mistake
Spilled grains on the tray show immediately where the pour went wrong, and the tray keeps them contained so the child can pick them up and try again.
The words come after the hands
| Words | Shown with |
|---|---|
| pitcher | The small jug. Say pitcher, not cup. |
| pour | The movement itself, said once as you finish. |
| spout | Where the grains come out. |
| handle | Where the pouring hand goes. |
| full, empty | The two states of a pitcher, which swap with every pour. |
The three-period lesson, scripted
You need the full pitcher and the empty pitcher, after the child has poured many times.
| Period | What you do and say |
|---|---|
| 1. Naming | Touch the full pitcher: "This is full." Touch the empty one: "This is empty." Repeat each word a few times, then pause. |
| 2. Recognition | "Show me the full one." "Give me the empty one." Pour, then ask again. The answer changes with every pour, which toddlers tend to enjoy. |
| 3. Recall | Point to one pitcher and ask "What is this?" The child answers "Full" or "Empty." |
Our suggestion. Montessori gave words for qualities in contrasting pairs, such as large and small or thick and thin. Full and empty work the same way.
Extensions and variations
- Pouring into two or three smaller containers to marked levels
- Pouring through a funnel
- Pouring a cup of water at snack time, the real use of the skill
- Moving on to water pouring with a sponge for spills
Variations
- Larger dried beans or chickpeas for younger toddlers, which are easier to pick up
- Fine sand or lentils once the child pours steadily
Make it or buy it
| Material | Make it | Buy, approx. |
|---|---|---|
| Small Pouring Pitchers | Easy | $8 to $34 |
| Work Tray | Easy | $18 to $27 |
Prices noted . Approximate US street prices for home-use versions; they vary by maker and change often, so recheck before buying.
Making it at home
Two small matching pitchers (creamer jugs work well) and a rimmed tray are all you need. Fill only to about a third so the child can lift it comfortably. Use material large enough to be safe for your child if it goes in the mouth.
What to check when buying a set
Montessori suppliers sell matched pitcher sets, but small glass or ceramic creamers from a kitchen shop are just as good. Breakable is fine and teaches care, as long as an adult is nearby.
Printables for this age
This work needs only the material, so it has no printable of its own. The shelf plan below places it among the other works for the same age.
- Shelf plan for 18 to 24 monthsPDF, 1 page, 198 KBEvery work for this age on one page, in order, with a column to date each presentation.
Every printable for one age, by email
The shelf plan and the lesson printables for your child's age in one email, then three short emails on the first lesson, what to make or buy, and what comes next.
Signs the child is ready, and signs it is done
Ready for the first presentation
- Sits at a small table for a few minutes at a stretch.
- Carries a tray across the room with both hands.
- Holds a cup by its handle.
- No longer puts every small thing in their mouth, or you are using beans too big to swallow and staying at the table.
Ready for the next lesson
- Pours across and back with nothing on the tray.
- Picks up a spilled grain without being asked.
- Carries the tray back to the shelf and sets it in its place.
- Asks to pour a drink at the table.
Fitting it into a home, not a classroom
| If you have | Do this |
|---|---|
| A baby in the house | Keep dry pouring for nap time or a table the baby can't reach. Rice and beans on the floor are a choking hazard for a crawler. |
| A tight budget | Two small measuring cups with spouts, or two creamer jugs from a thrift shop, and any rimmed baking sheet. |
| A child who loves dumping | Give the dumping a home outdoors: a bucket and a scoop in the sandbox. Keep the tray for careful pouring. |
| Glass or plastic | Small glass or china jugs teach care, and a dropped one teaches it fast. Stay in the room and sweep up any glass yourself. |
When it does not go to plan
| When | Try this |
|---|---|
| Rice ends up everywhere. | Check the fill level first; a third full is plenty. A tray with a taller rim helps. Present again another day, slower. |
| The child pours in one fast tip. | Show the two fingers under the spout again. Slow hands in the presentation do more than any instruction. |
| The child eats the rice. | Put the tray away calmly and try again in a few weeks, or switch to something that is fine to taste, like large oat flakes. |
| One pour and they walk away. | That's fine at 18 months. Leave the tray on the shelf; a child often comes back to it alone. |
Hazards to check before each session
Rice, dried beans and chickpeas are all choking-size for a child under 3. Use the largest beans you have and stay at the table until the tray is back on the shelf.
Breakable pitchers are fine with an adult in the room. Keep a dustpan nearby and clear any broken glass yourself.
Where other sequences and standards place it
We have not bought the paid homeschool curricula, so they are not listed here.
| Framework | Where it sits |
|---|---|
| This site's Practical Life sequence | Lesson 2 of 12 published, before Button Dressing Frame and Wet Pouring Between Two Pitchers and Sweeping with a Brush and Dustpan and Land and Water Forms. Checked in: the scope and sequence |
| Montessori, Dr. Montessori's Own Handbook (1914) | Management of the household, one heading of muscular education. The two-pitcher dry pour itself is a later album exercise; the Handbook has children drawing and pouring away water at little sinks and carrying a tureen of hot soup to the table. Checked in: A "Children's House"; Motor Education; Writing |
| Montessori, The Montessori Method (1912) | Montessori lists pouring the child's soup among the jobs adults take over because the child is slow. The pouring lesson hands that job back. Checked in: Chapter XXI, General Review of Discipline |
| Head Start Early Learning Outcomes Framework, preschool | P-PMP 3: the child demonstrates increasing control, strength and coordination of small muscles. Checked in: www.in.gov |
Dry pouring: questions parents ask
What are some good Montessori activities for an 18-month-old toddler?
Real tasks with small, safe objects: dry pouring between two pitchers, hand washing at a stool by the sink, putting shoes on a low rack, carrying a tray, wiping a table. Each has one clear movement and a visible end. Dry pouring is one of the first because a toddler can see the result of every pour.
Should I use rice or beans for dry pouring?
Start with large beans or chickpeas. They pour slowly, a stray one is easy to see and pick up, and they're less likely to go down whole than rice. Move to rice or lentils once the child pours without spilling.
When does a child move from dry pouring to water?
When the dry pour is clean in both directions, usually a few weeks to a few months after the first presentation. Water spills faster and spreads, so add a small sponge to the tray and show how to wipe up before the first water pour.
Sources cited by book and chapter
- Maria Montessori, The Montessori Method (1912)
Chapter XXI, General Review of Discipline
Adults who see little children slowly dressing, washing and setting the table do it for them, pouring the soup into the child's bowl, feeding him and setting the table for him.
- Maria Montessori, Dr. Montessori's Own Handbook (1914)
A "Children's House"
Against the wall of the dressing-room stand little sinks with water-taps where the children draw and pour away their water.
Motor Education
Muscular education covers the primary movements of everyday life, the care of the person, management of the household, gardening, manual work, gymnastic exercises and rhythmic movements.
Children as young as two and a half come of their own accord to take their turn at household duties such as serving at table and washing dishes.
Writing
Children who carry three or four tumblers at a time or a tureen of hot soup know they are responsible for the objects and for the meal.
Reviewed by
What to offer next
Once the child chooses this work unprompted and finishes it without help, the next lesson to prepare is Button Dressing Frame.
- Hand Washing15 months to 3.5 years
- Dry pouring18 months to 3.5 years
- Spooning18 months to 3.5 years
- Wet pouring2 to 4 years
- Grace and courtesy2 to 6 years