Button Dressing Frame
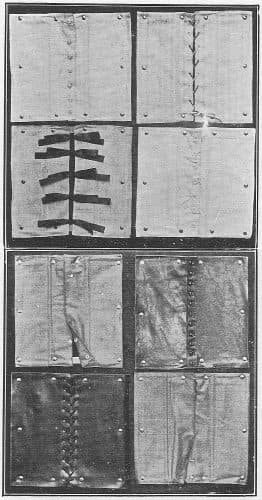
A button dressing frame is a wooden frame holding two cloth panels that close down the middle with large buttons, usually five. A child of about 2.5 to 4 unbuttons and buttons it flat on a table before trying a coat. Montessori used ten frames, and her first joined heavy wool with large bone buttons.
Sourced from the texts, not yet presented at home
| Typical age | 2.5 to 4.5 years |
|---|---|
| Area | Practical Life |
| Before this | |
| Materials | |
| Direct aim | To unbutton and button large buttons independently. |
| Control of error | Each button has one matching hole. A skipped or doubled button leaves the panels visibly misaligned at the bottom. |
| Leads to | Later lessons in this line are in preparation. |
| Time | About 5 minutes (our estimate): open every button, close every button. |
| Grouping | One child at a table. Montessori's classes had up to ten children at the frames at once, each with their own. |
| Parent prep | None once the frame is on the shelf. |
| Cost | Buy about $16 to $47. Make: possible to make with some effort. |
| Other names | Buttoning frame, Large button frame, Dressing frame: buttons |
What the work teaches
Direct aim. To unbutton and button large buttons independently.
Indirect aims, the ones you will not see at once
- Independence in dressing
- Fine motor control and the pincer grip
- Concentration and order through a fixed sequence of steps
- Preparation of the hand for writing
Set it out before you invite the child
One frame with large buttons, 2 cm across or more, and buttonholes cut slightly generous.
A clear table. The frame lies flat, buttons facing up, the top edge away from the child.
Montessori's set of ten had three button frames (bone buttons on wool, pearl buttons on linen, shoe buttons on leather), three lacing frames, two hook-and-eye frames, one of ribbon bows and one of press fasteners.
Store the frame upright on the shelf, panels closed, so it's ready to start.
Presentation, step by step
- 1Carry the frame to a table with both hands and place it in front of the child, buttons facing up.
- 2Unbuttoning: starting at the top, hold the edge of the fabric beside the first button with one hand. With the other hand, push the button halfway through the hole, then pinch it from the other side and pull it through.
- 3Work down to the last button, moving slowly enough that the child can see each grip.
- 4Open the left flap, then the right flap, to show the frame fully open. Close them again, right then left.
- 5Buttoning: starting at the top, pinch the button and hold the buttonhole open with the other hand. Push the button partway through the hole, then pinch it from the other side and pull it fully through.
- 6Repeat down to the last button and smooth the fabric.
- 7Invite the child to try, then return the frame to the shelf.
Details that hold the child's attention
The moment the button slips through and the cloth closes behind it.
Both flaps opened wide to show the empty frame.
How the child sees a mistake
Each button has one matching hole. A skipped or doubled button leaves the panels visibly misaligned at the bottom.
The words come after the hands
| Words | Shown with |
|---|---|
| button | The round piece that goes through. |
| buttonhole | The slit it goes through. |
| unbutton, button | The two directions of the work. |
| flap | Each cloth panel. |
The three-period lesson, scripted
You need the button and the buttonhole on the frame.
| Period | What you do and say |
|---|---|
| 1. Naming | Touch a button: "Button." Touch a hole: "Buttonhole." Two or three times each. |
| 2. Recognition | "Show me a button." "Put your finger in a buttonhole." |
| 3. Recall | Point to one and ask "What is this?" |
Our suggestion: give the names on another day. The frame is taught with the hands, and a child busy with the grip doesn't need words yet.
Extensions and variations
- Smaller button frame
- Buttoning a cardigan laid flat on a table, then while wearing it
- Other frames: snaps, zipper, buckles, bows
- The bow frame last. Montessori separated tying the two ribbons from making the bow
Variations
- A buttoned pillow cover or a large shirt draped over a chair back as a home stand-in
Make it or buy it
| Material | Make it | Buy, approx. |
|---|---|---|
| Button Dressing Frame | With effort | $16 to $47 |
Prices noted . Approximate US street prices for home-use versions; they vary by maker and change often, so recheck before buying.
Making it at home
Two pieces of sturdy cotton, five large buttons and a simple wood frame (or an old picture frame) make a good version. Make the buttonholes slightly generous at first.
What to check when buying a set
Dressing frames are often sold in sets. If you buy only one, start with large buttons; snaps or a zipper can come next.
Printables for this age
This work needs only the material, so it has no printable of its own. The shelf plan below places it among the other works for the same age.
- Shelf plan for age 2PDF, 1 page, 325 KBEvery work for this age on one page, in order, with a column to date each presentation.
Every printable for one age, by email
The shelf plan and the lesson printables for your child's age in one email, then three short emails on the first lesson, what to make or buy, and what comes next.
Signs the child is ready, and signs it is done
Ready for the first presentation
- Picks up small things between thumb and finger.
- Sits at a table for five minutes on one task.
- Pulls at their own buttons, or asks to do their coat.
- Has poured dry grains between pitchers without spilling.
Ready for the next lesson
- Opens and closes every button on the frame without help.
- Lines up the two edges before starting.
- Buttons their own coat or cardigan.
- Asks for the next frame.
Fitting it into a home, not a classroom
| If you have | Do this |
|---|---|
| No frame | An adult's shirt with big buttons, laid flat on the table or buttoned around a cushion. |
| Mornings are rushed | Keep the frame for calm afternoons. Practice at the door, with coats waiting, rarely goes well. |
| Two children | Two frames side by side. Montessori described ten children working the frames at once, quietly, around little tables. |
| A tight budget | Make one frame with large buttons and skip the rest of the set until it is mastered. |
When it does not go to plan
| When | Try this |
|---|---|
| A button is skipped. | Leave it. The panels will be uneven at the bottom, and sooner or later the child sees it. |
| The child gets frustrated and pulls. | Loosen the buttonholes with a few stitches cut, or switch to bigger buttons. Present the push-and-pinch again, slower. |
| The child refuses help on their real coat. | That's the frame working. Montessori saw children defend themselves against the adult who tried to help them dress. |
| Only unbuttoning, never buttoning. | Unbuttoning is easier and usually comes first. Close the frame yourself so it's ready, and show buttoning on its own another day. |
Hazards to check before each session
Check each button's thread before every session. A large button that comes loose is still small enough to choke a child under 3.
Homemade frames: staples or tacks holding the fabric should sit flush, with nothing sharp at the edges.
Where other sequences and standards place it
We have not bought the paid homeschool curricula, so they are not listed here.
| Framework | Where it sits |
|---|---|
| This site's Practical Life sequence | Lesson 6 of 12 published, after Dry Pouring Between Two Pitchers. Checked in: the scope and sequence |
| Montessori, The Montessori Method (1912) | First grade of the sequence: buttoning and lacing are given as soon as the child comes to school, alongside the cylinders. Checked in: Chapter XX, Sequence of Exercises |
| Montessori, Dr. Montessori's Own Handbook (1914) | The first step in care of the person is dressing and undressing, taught on buttoning and lacing frames. Checked in: Motor Education |
| Head Start Early Learning Outcomes Framework, preschool | P-PMP 3 (small muscle control) and P-PMP 4 (personal hygiene and self-care skills). Checked in: www.in.gov |
Button frame: questions parents ask
What are examples of practical life skills?
Dressing and undressing, washing hands, pouring, carrying a tray, sweeping, setting the table, folding cloth. Montessori's frames break dressing into one fastening each, so buttoning can be practiced apart from the hurry of getting dressed.
Which dressing frame comes first?
Large buttons. Montessori's first frame was heavy wool with large bone buttons, matched to children's dresses. Snaps and the zipper are also early; bows and lacing come last.
Is a dressing frame worth buying?
One is, if you can't make it. Frames cost about $12 to $40 each. A homemade frame from an old picture frame and two cotton panels works just as well, and an adult's shirt is a fair free stand-in.
Sources cited by book and chapter
- Maria Montessori, The Montessori Method (1912)
Chapter IX, Educational Gymnastics
Ten wooden frames, each mounted with two pieces of cloth or leather to be fastened and unfastened, each one illustrating a different process in dressing or undressing.
The first frame joins heavy pieces of wool with large bone buttons, the second linen with pearl buttons, and the third leather with shoe buttons fastened with a button-hook.
With the frames the children analyse the movements of dressing by repeated exercise, and once they know how they want to dress themselves; ten children at the frames together look like a workroom of tiny workers.
Chapter XX, Sequence of Exercises
In the first grade, as soon as the child comes to school, he may be given the buttoning and lacing exercises together with the cylinders.
- Maria Montessori, Dr. Montessori's Own Handbook (1914)
Motor Education
The teacher sits by the child and performs the movements very slowly, separating them into their parts: she brings the edges together, sets the button opposite the buttonhole and makes it enter completely.
A child who fastens and unfastens the same frame many times over wants to fasten real clothes and defends himself against the adult who tries to help him.
Reviewed by
What to offer next
Once the child chooses this work unprompted and finishes it without help, the next lesson to prepare is Sweeping with a Brush and Dustpan.
- Wet pouring2 to 4 years
- Grace and courtesy2 to 6 years
- Button frame2.5 to 4.5 years
- Sweeping2.5 to 5 years
- Folding cloths2.5 to 5 years