Button Dressing Frame
A button dressing frame is a wooden square, about 30 cm a side, holding two cloth panels that a child of 2.5 to 4.5 unbuttons and buttons flat on a table. Single frames cost $15.95 to $47.35 at three US sellers on October 2, 2026. An old picture frame, cotton and five large buttons make one at home.
The first lesson with it is Button Dressing Frame. Not sure your child is ready for it? Two minutes of questions place your child on the sequence.
| Area | Practical Life |
|---|---|
| Used in | |
| From age | 2.5 to 4.5 years |
| Make it | Possible to make with some effort |
| Buy it | About $16 to $47 (noted ) |
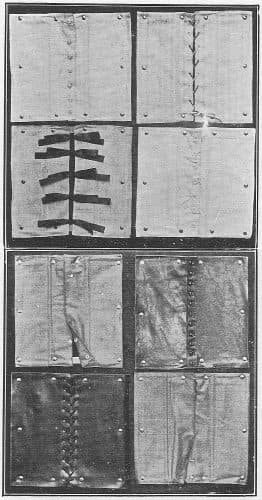
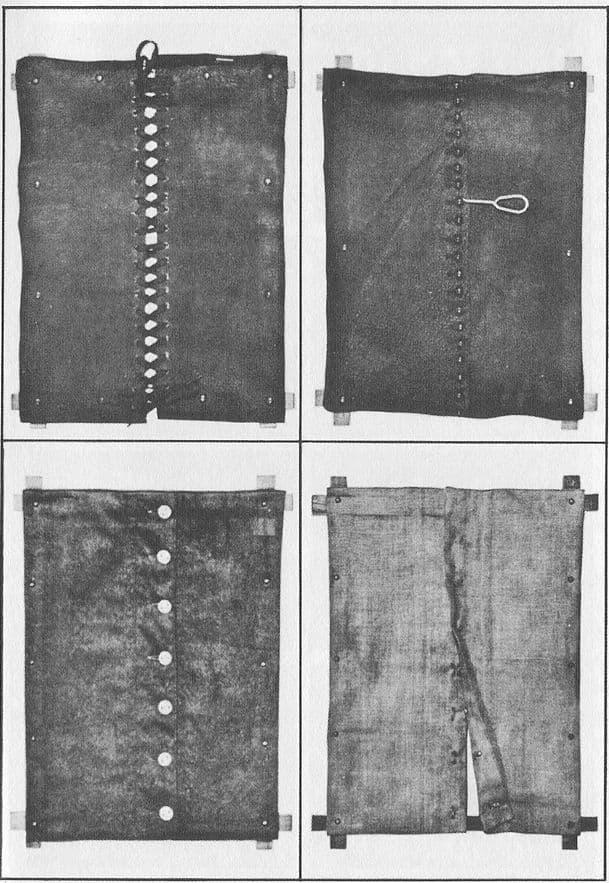
What the button dressing frame is for
The frame takes the fastening off the child's body. A coat's buttons sit under the chin where the child can't see them. On the frame they lie flat in front of the hands, one at a time, top to bottom.
Montessori's 1912 schools had ten frames, each for a different fastening, every one a wooden frame with two pieces of cloth or leather. The first closed heavy wool with large bone buttons, the kind on a child's dress.
| Part | What it looks like |
|---|---|
| Frame | Square, in wood; Nienhuis gives 29.5 cm a side |
| Panels | Two pieces of cotton meeting down the middle; Montessori Outlet's lift off for washing |
| Buttons | Large, 2 cm across or more |
| Buttonholes | A little generous on a first frame, so the button goes through on the first push |
The lessons that use the button dressing frame
Button Dressing Frame
2.5 to 4.5 yearsPracticing buttoning and unbuttoning on a wooden frame with two fabric panels, so the child can master the movement before trying it on their own clothes.
Buying one: 3 listings checked October 2, 2026
| Seller and set | Made of | Price |
|---|---|---|
| Montessori OutletButtoning Frame With Large Buttons (510200040)Fabric comes off for washing. Page also shows a "market price" of $47.35. In stock. | Beech frame, cotton fabric | $15.95 |
| Alison's MontessoriDressing Frame: Large Button (P15)Sale price; regular $22.00. 12 by 14 inches. Made in Thailand. | Cotton fabric; frame wood not stated | $19.80 |
| NienhuisButtoning Frame With Large Buttons (000200)29.5 by 29.5 cm, green fabric. US store price. | Beech, fabric | $47.35 |
- One frame is enough to start. At home the second frame is whatever is giving trouble on real clothes: a zip, snaps, a shoe buckle.
- On a secondhand frame, tug every button before you buy. Thread that has worked loose turns a large button into a choking hazard for a child under 3.
- Montessori Services sells a frame that mixes buttons, a zip and hook-and-loop on one panel, and The Montessori Room's button frames were sold out, so neither is in the table.
Making the button dressing frame at home
What to gather
- A wooden picture frame about 30 cm square, glass and backing taken out
- Two pieces of sturdy cotton, each about 22 by 32 cm
- Five buttons 2 cm across or larger, and strong thread
- A staple gun or small upholstery tacks
- A sewing machine, or iron-on hem tape and a needle
| Piece | Size and marking | How many |
|---|---|---|
| Button panel | About 22 by 32 cm cotton, inner edge folded double | 1 |
| Buttonhole panel | Same size, inner edge folded double | 1 |
| Buttons | 2 cm across or more | 5 |
- 1Fold the long inner edge of each panel over 2 cm twice. Stitch it down, or iron hem tape in, so buttons and buttonholes sit in a double layer.
- 2Mark five points about 5 cm apart down the folded edge of one panel and sew a button at each.
- 3Lay the second panel over the first with a 3 cm overlap and mark a buttonhole opposite each button. Cut each one 3 mm longer than the button is wide and stitch round it.
- 4Pull each panel taut across the back of the frame and staple it, starting from the middle of each side.
- 5Button it closed and tug every button. None should move.
Keeping a full set on the shelf
- Store the frame buttoned, upright on the shelf, so the next turn starts from a closed frame.
- Tug the buttons before each session and resew any that shift. Wash removable panels when they turn grey; a grubby frame gets left on the shelf.
Questions parents ask about the button dressing frame
What are examples of practical life skills?
Buttoning, pouring, washing hands, sweeping, laying the table, folding cloths. Montessori's 1912 frames split dressing into separate movements and gave each its own frame: buttons on one, hooks and eyes on another, laces and press fasteners on others. A child learns one at a time.
Which dressing frame should come first?
Large buttons. They're the easiest fastening to see and grip, and Montessori's first frame used large bone buttons. Smaller buttons come next; snaps and zips after that.
My child can button the frame but not a coat. Is that normal?
Yes. On the frame the buttons face up, in plain view. On a coat they're under the chin and upside down from where the child stands. Lay the coat flat on the floor and button it there first, then try it worn.
Before the button dressing frame, make sure the work before it is solid. The dry pouring between two pitchers lesson lists the signs that a child is ready to move on.